Update Sunday 16:02 h
Dasha at Patching Pixies commented below that it looks like reverse appliqué so I checked with Linda Clements' publication "A Quilter's Bible" and she gives Mola as an example of reverse appliqué! The teacher at the workshop had said the Mola is worked from the front and reverse appliqué from the back. Does anyone else have any thoughts on this?
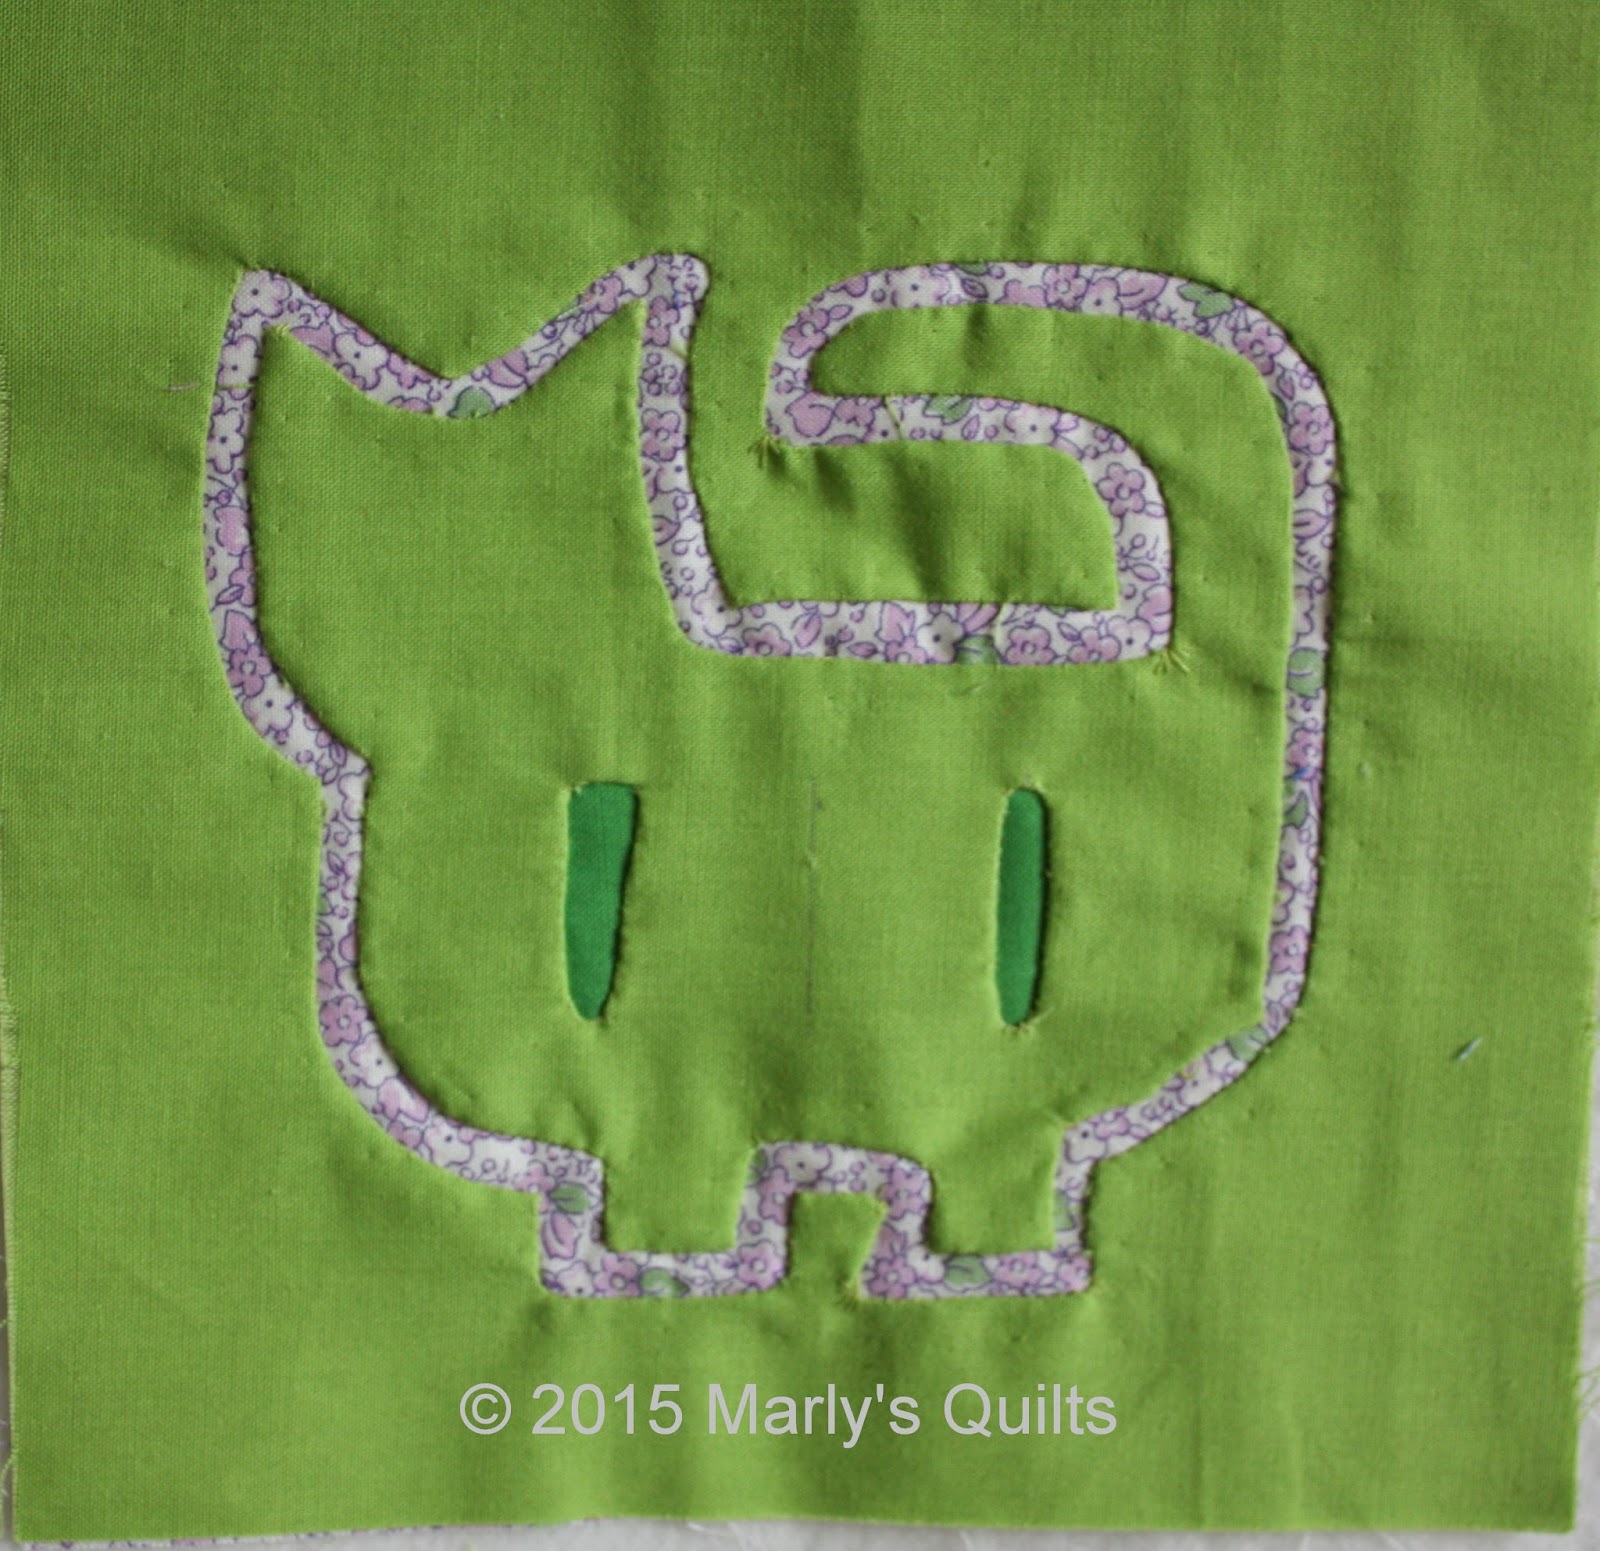
The workshop project was to make a representation of a cat:
Everyone was asked to bring two fabric squares of at least 15cm (6") of which at least one should be a solid.
We cut out a paper template and then drew round the stylised outline of a cat onto the plain fabric.
Next we tacked the two pieces of fabric together about 8mm on either side of the drawn line.
I was too busy during the workshop to take many photos, but did manage to take one with my phone:
The next step was to carefully cut through the top fabric along a small length of the drawn line and to fold the edges under and sew them down with an invisible appliqué stitch (or as near invisible as possible!)
The following step was to insert another piece of fabric between the two layers to make the vertical lines on the cat's body. For this two cuts had to be made in the top layer and a piece of fabric (here dark green) pushed and pulled into place between the two squares. The pin in the second photo is holding the fabric in position while I was sewing down the edges of the vertical splits.
This was an interesting afternoon learning a new technique, but I'm not sure how I'm going to apply this to anything I'm likely to be making soon. I haven't finished the piece yet as I still have to make the eyes; that will be the real challenge as sewing round the inside of a small circle is more difficult than a straight line, and look what a mess I made of the vertical lines (they are meant to be the same size!). If I finish it this side of Christmas I'll post again about my progress!

The workshop project was to make a representation of a cat:
 |
| Mola work in progress |
Everyone was asked to bring two fabric squares of at least 15cm (6") of which at least one should be a solid.
We cut out a paper template and then drew round the stylised outline of a cat onto the plain fabric.
Next we tacked the two pieces of fabric together about 8mm on either side of the drawn line.
I was too busy during the workshop to take many photos, but did manage to take one with my phone:
 |
| the start of the Mola work: you can see the drawn line and the tacking |
 |
| The green fabric is folded back to reveal the purple flowered print and dark green solid underneath. In the photo it looks as if the print is on top of the green, but it is really peeping through. |
This was an interesting afternoon learning a new technique, but I'm not sure how I'm going to apply this to anything I'm likely to be making soon. I haven't finished the piece yet as I still have to make the eyes; that will be the real challenge as sewing round the inside of a small circle is more difficult than a straight line, and look what a mess I made of the vertical lines (they are meant to be the same size!). If I finish it this side of Christmas I'll post again about my progress!
I'm linking up with Celtic Thistle Stitches for
Click on the image to see what's new to some other bloggers.
Happy sewing
Marly.
5 comments:
Looks very much like reverse applique to me! Except for the bit where you inserted a third fabric.
The technique interests me. The cat is adorable. The fun thing about learning a new technique is you never know when it might come in handy, or inspire you to take it to a new level.
It's always good to learn new stuff!
Very cute cat. I'm fascinated by how my eye is sure that the print is on top of the green, even though I know it isn't.
No matter what you call it, it looks like it was a fun workshop Marly :)
Thanks for linking up to New to Me too!
It's definitely reverse applique. I've done quite a lot of it and have never stitched it from the back. It's fun to know and you never know when you will want to use it. I've even used it to mend something! Your cat is cute, by the way!
Post a Comment