Monday 22 December 2014

Optical Illusion 1

Not much optical illusion here yet:

Optical Illusion.
On the left the middle three strips (the narrowest).

but I thought I'd share the process with you. I'll be posting again on this project over the next few weeks (and knowing me - months!)

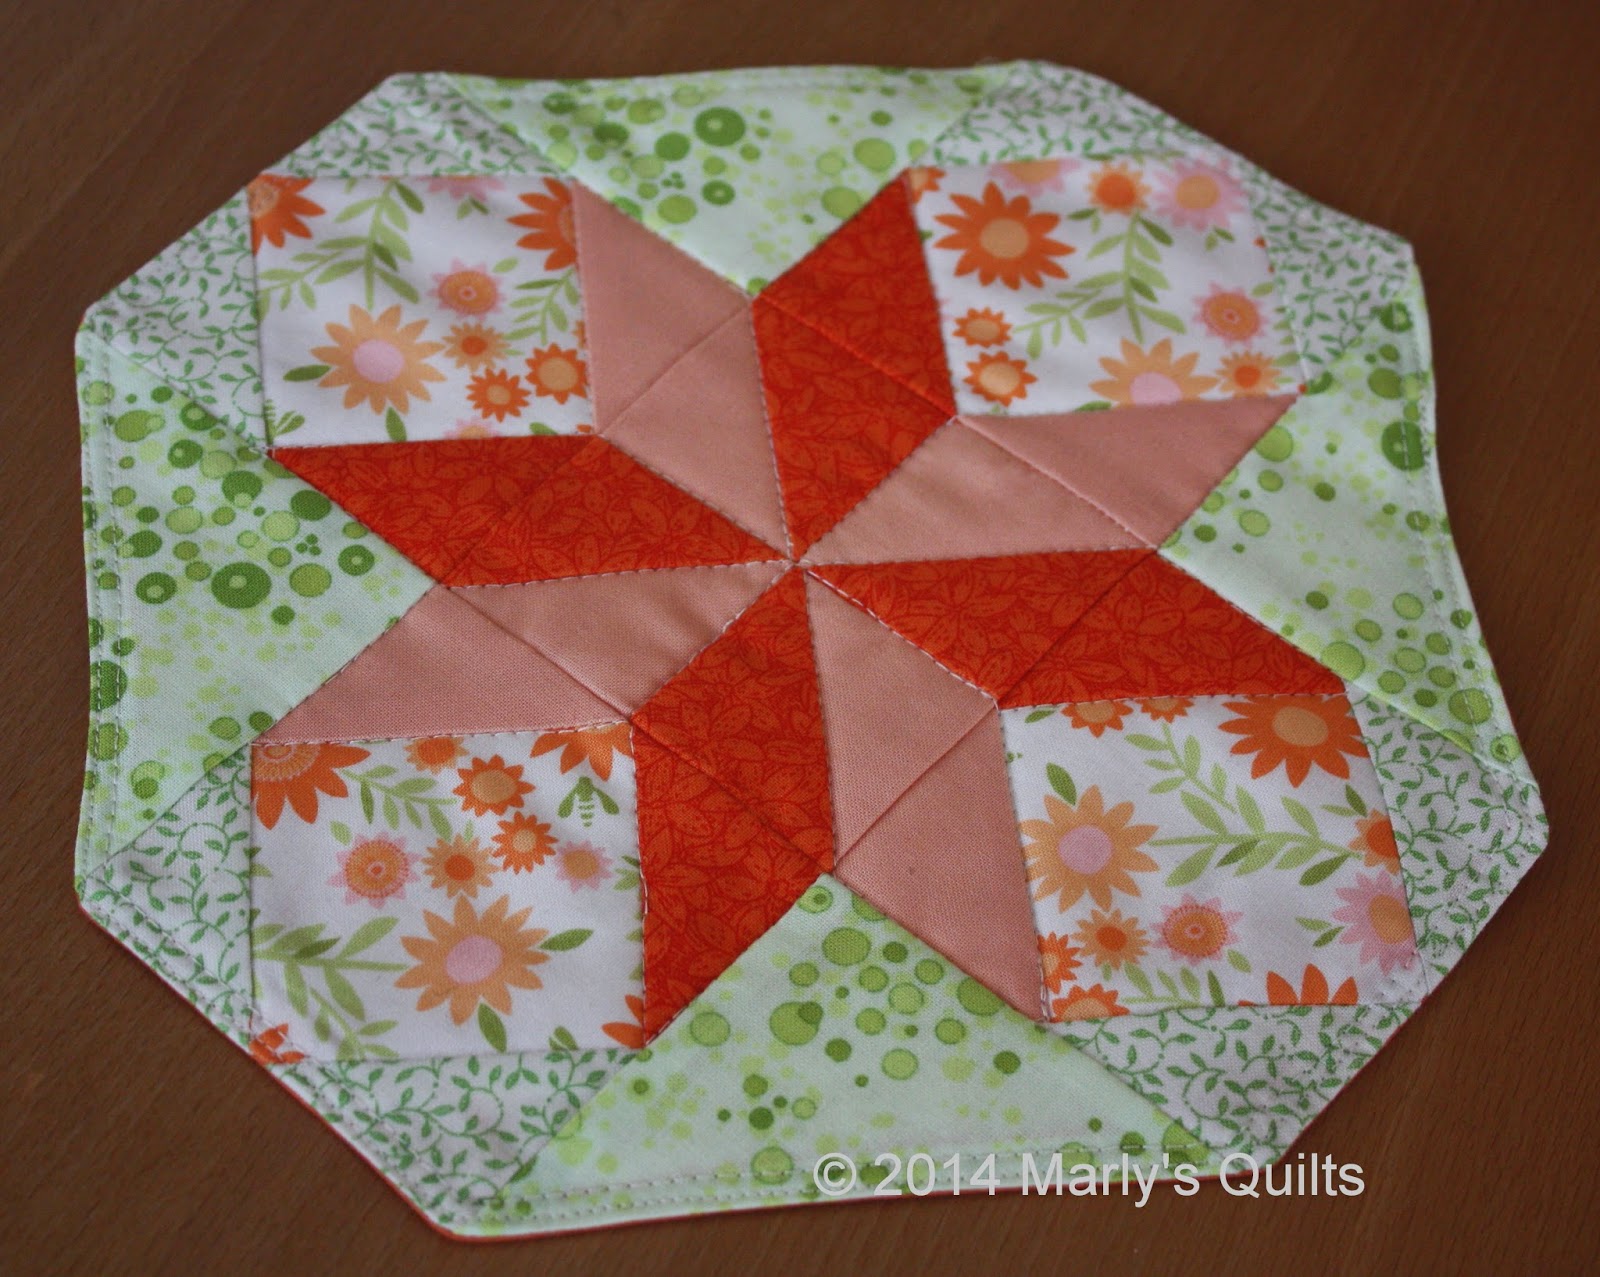
I started sewing it yesterday, but I've been working on it since the beginning of November. This is a course at Quilters Palet in The Hague to make an optical illusion quilt, but without a standard pattern. Each participant was given about six grids that can serve as the base for the design and the first session (and a few more evenings) was spent in drawing more lines and colouring until a satisfactory result appeared. I tried using several grids before I arrived at this one.

Then choosing the fabric. I've since seen a black and white quilt on Pinterest (unfortunately the name of the maker is not given in the original post) using this grid as the basic design and that would have been easier, but I chose four shades of yellow and five of green and the dark purple as the contrast colour. It doesn't look like it but there really are four different yellow solids in the photo above, along with the lightest green and a lot of purple.

My original coloured design on A4 size paper

At the same time the A4 sheet with my original design had to be blown up to mammoth proportions,

Amazing, isn't it - you go to a professional printer and he manages to print it crooked!
(original at the bottom)

the strips traced onto dressmakers' pattern paper (all 23 of them), and then pieced paper piecing style.

paper piecing: the figures on the papers help me keep track of which fabric to use


the sewing set up: the fabric swatch chart in the foreground helps me identify the fabrics I'm using,
I'm working on two strips simultaneously so I can chain piece;  more than two  would be too confusing.

I started with the narrowest strips because I needed to check that the smallest blocks are more than ¼" square because of  the seam allowances. I'm going to sew these together next and see how they go, otherwise I 'll scrap them and just leave out these rows.

The next, and final, lesson is on 9 January so I hope to have something more than four rows to show. I have no idea how I'm going to quilt this, or whether I want borders or not. Still lots to think about and decisions to make.

I'm linking up to :

Patchwork Times Linky Tuesday at Freemotion by the River  

So head over there to see what else has been going on this week.

Happy sewing

Marly.


Saturday 20 December 2014

RSC 14: week 51 - advice please!

Thanks everyone for your input last week. Your overwhelming advice was that the piano keys border would be too busy. I need to make up the size with a border but it will be plain off-white. But now I'm about to ask for advice again.

This, my friends is as far as I've got:


By Wednesday three quarters of my scrappy rainbow quilt top was joined together in three sections The fourth quarter (bottom left, above) was waiting for two pink blocks, but they're going to have to wait until I can buy more pale pink fabric.

Then on Thursday I laid everything out and decided to make an extra row. That extra row still needs one purple and three black blocks. The section lower right in the photo should be finished this week (the three black blocks).

I am going to quilt this in four sections and then join together afterwards. But now here comes the

BIG QUESTION:

when would you advise me to add the borders?

As I see it there are two options:

  1. Before I quilt the centre sections. Sew the borders onto each quarter and quilt the section and the border pieces together - the border will have joins in the middle of each side and at the corners; there will be just four pieces of wadding to join.
  2. After I've quilted and joined the centre sections. Join the for sections of the top centre (as in the photo) Sandwich and quilt four border sections separately and then add them to the top. Then, as last, join the border sections in the corners. - the borders could have not properly lined up quilting in the corners (knowing me, that's highly likely); there will be eight pieces of wadding to be joined.
Just writing it out has helped me a lot! But I would really appreciate your advice as I'm sure there's a pitfall somewhere I've overlooked.

I'm linking up to:

Soscrppy

so call in there today and look over the rainbow.


Happy sewing

Marly.

Saturday 13 December 2014

RSC 14: week 50

One quarter of my rainbow top is nearly there!


I'm going to quilt this in four sections and then join them QAYG style. I've never done that so it's fingers crossed!

Before I start quilting though I'm going to have to add border(s) because I need a little extra width and length. I think 4" all round should be enough. I can't decide whether to do one plain off-white border 4"wide, or a 1" off-white border and a rainbow piano keys border on the outside. Give myself a lot of extra work! So friends, any suggestions?

All the other blocks already have their right hand side sashing attached and are waiting for space on my design curtain.

I'm linking up to 

Soscrppy

so head over there and see some more scrappy goodness.

Happy sewing

Marly.

Tuesday 9 December 2014

An old project revisited: lap quilt

I never posted about this quilt because I made it in the summer of 2013, about four months before I started blogging.


So here now is an account of the lap quilt I made for my husband's birthday in 2013.

In the middle of winter he suggested that as he was feeling rather cold while watching TV, I might be interested in making him a quilt. No sooner said than started! Well, started ... planning!

I found a pattern fairly quickly: this is the Disappearing Nine-Patch which I saw on YouTube from The Missouri Star Quilt Company.


For the fabric I had to wait until I could make a trip to the LQS, which doesn't carry many pre-cuts, but fortunately did have two charm packs of Barbara Brackman's "Metropolitan Fair", which purveys the necessary sense of conservative manliness for this project. To this I added the end of a roll of "Battle Hymn" (also by Barbara Brackman) for the backing, and half a metre of a Bella Solid (I believe "Sand" but I'm not certain any more) which matched the base dye of the printed fabric (the background colour in the selvedge). From this I cut 5" squares to use as the centre squares in the nine-patch (they get cut once in each direction during the disappearing trick) and for the middle border.


As far as possible I reserved the charms with large prints for the outer corners of the nine-patch (they're the ones that don't get cut), and used the small and medium prints in the sides of the nine patch (they get cut once through the middle) Unfortunately, as seen in the photo above, there were fewer large print squares than needed.

Sewing, cutting, sewing again went according to plan, and in the greatest secrecy, but not as quickly as I'd hoped because life got in the way! Finally in the middle of July, just BEFORE my second carpal tunnel operation, I managed to get it quilted. Managed, but I don't know how; I had to stop every 5 minutes because the pain was too much. Then followed a pause of a month for the operation and recuperation until my wrist had recovered enough to sew the binding.


By then I was feeling as fit as a fiddle, and could take anything on, but the weather intervened. While the average summer temperature here is probably about 22ºC I found myself sitting in my shorts on the balcony with a quilt on my lap in temperatures of 35ºC - just 1ºC less than normal body temperature! - while I hand sewed the binding. 


Definitely not the ideal conditions. But the deadline of the middle of August was fast approaching.

Remember I said something above about the greatest secrecy? That was not easy when the temperatures were so high, as my husband was working a "tropical timetable" - starting a 05:30  or 06:00 and finishing at ??? - sometimes 12 noon, or 13:00. Several times I bundled the whole quilt into a box and shoved it into the bottom of a cupboard when I heard his key in the latch!

Finally it was completed with a couple of days to spare, after being in the make for six months. I named it "Hop-Scotch" because the pattern made by the light squares reminds me of a game of that name I played as a child: hopping from square to square in a grid drawn on paving stones. The quilt was well received: he doesn't know the game hop-Scotch, but he knows Scotch! 

Congratulations for reading this far! If you're interested in making a Disappearing nine-patch click the link to the Missouri Star QC above and for more lap quilt inspiration hop over to Val's:

Val's Quilting Studio

Happy sewing

Marly.


Monday 8 December 2014

The last of the "Little Letters"

Having made all the letters as far as "R" several weeks ago, I worked through the rest of the alphabet on Saturday morning.

The X is a disappointment. I shall be redoing it before long.

The quilt pattern from The Temecula Quilt Company QAL has four more blocks to make up the 26 letters to a 5 x 6 block layout. I still have to make those and add the sashings, so there's some way to go still.

The complete alphabet with spaces for the four remaining blocks.
(My apologies for the thready wall; I believe a loo brush works wonders. A clean one, that is!)

The letters are really very easy to make, and the great thing is the patterns are staying up on the site, so if you're interested in using them too go and take a look.


Linking up this week to:
stitch by stitch Patchwork Times Freemotion by the River 
Wednesday link up Sew Fresh Quilts Needle and Thread Thursday  


Happy sewing


Marly.


Sunday 7 December 2014

Finished in time for Christmas!

My Christmas table runner:


finished yesterday evening. I was hoping to be finished sooner, but my real job has been very demanding over the last month, leaving me too tired to pick up a needle, and that's tired!

Fabric: body: Solstice by Kate Spain for Moda (one charm pack);
            binding: fabric of unknown title by www.stof.dk for MCS (?)
Pattern: my own, but I'm indebted to Amy Smart (Diary of a Quilter) for her Hourglass block tutorial
Thread: Aurifil 40 off-white (2309) for both piecing and quilting and red (2250) for binding.
Wadding: standard cotton wadding sold by LQS
Backing: Off-white Bella Solid


Having had a bad experience trying to quilt this with variegated thread a few weeks ago (see here), I returned to it this week and did some simple squiggles with a neutral coloured thread. I think this is a much better result, and I shall be keeping variegated thread to use on solid fabric.


I love the fabric I used for the binding so much, I'm off to the quilt shop on Tuesday to buy more. I love using stripes in a binding. I'm sorry I can't give the fabric name; there isn't much selvedge on 25cm of fabric.

Linking up this week to:
stitch by stitch Patchwork Times Freemotion by the River  Sew Fresh Quilts Needle and Thread Thursday blogbutton photo peacockfmq025_zpse5bceb10.jpg 


Happy sewing


Marly.

Saturday 29 November 2014

Finished mug rug

Not the biggest project ever!


I gave this to a friend for a birthday present last weekend, together with two mugs. There's no photo of the second mug; I'd already wrapped it! It's similar but with a different painting, and with an orange rim.


I followed this pattern from Julie Cefalu, "The Crafty Quilter". I was attracted to the unusual shape, and cutting and assembly turned out to be really straightforward. I quilted in the ditch around and through the star, and did an extra row of stitching round the edge. The fabrics all came from my scrap box, and, although it's nearly Christmas, the choice of fabric was governed by the colour of the mugs. Anyway it was a birthday present.

Linking to:

 TGIFF


Happy sewing

Marly.

Saturday 15 November 2014

RSC 14: Week 46 Beginning to come together

Each week for the last eleven and a half months Angela at Soscrappy has posted instructions for making quilt blocks and each month the focus has been on another colour. This month's colour is pale blue, and we have been given four blocks.

For my layout I chose to move diagonally through the rainbow from pink through violet to red, and then repeat the sequence, and have tried, with limited success, to have the lighter blocks at the top.

Wednesday's provisional layout: before sorting on colour value

When I laid my blocks out  I decided I didn't need more than four pale blue blocks, so this week I have concentrated on filling the gaps in the pattern. With just three more blocks to make I've started adding I½" sashing strips to the right hand side of the blocks; I need to get them off the floor!

First the remaining two pale blue blocks, made last weekend

Zig-zag &  Road to Oklahoma (with sashing on the right)
Both in photo above.


then two more purple

Antique tile & Ceiling fan
Both in photo above

two black

Churn Dash & Contrary Wife
Now added bottom right

Detail from Churn Dash.
Don't you love the King of the Rosehips?

and one orange

Small bow ties;
already made in green but with a different layout


with just one more orange and two pink blocks to make.


I have cheated a bit because I included the tan/whisky coloured browns with the orange, as they can indeed be construed as being dark orange. At least, that's my story and I'm sticking to it!

The layout is an unusual one I think: ten blocks wide by nine blocks long with 1" sashing. But that feels right to me for a lap quilt/ throw. I think I will make a single fairly narrow border.

Linking up to 

Soscrppy

so head over there to see more rainbow blocks.

Happy sewing

Marly.


Monday 10 November 2014

Four more Little Letters

Instructions for two patchwork letters are being posted each week (one on Sunday and one on Wednesday) on the blog of the Temecula Quilt Company. They finish at 4" square, are really easy to make, and come together quickly. The project incorporates them in a quilt, but I see a potential for using them to personalise gifts.

On Sunday morning I made four more letters:


which brought me up to date. However, seeing as the tutorials are posted on Sunday and Wednesday, I'm already behind again!

On Thursday I started quilting my Christmas table runner.


I thought I would do a FMQ all over ramble with variegated thread.

Quilting? Now you see it; now you don't!
What a mistake! Variegated thread  doesn't suit me:

  • firstly: all the mistakes show up (and I am no expert)
  • secondly: it gives too fragmented an effect on already fragmented patchwork. 

Logical really,  but I had to experience it.

Just look at all those horrible wobbly lines, and
what is being achieved by using variegated thread?
After 20 minutes quilting this was clearly a mess so I broke my rule, (never unpick quilting!)


this was the only thing for it - for the next FIVE HOURS!

I haven't looked at it since, but this afternoon plan to choose one uni-coloured thread and start again. Which colour would you use?

I'm linking up to:

 Patchwork Times

so pop over there and see what else is going on this week.

Happy Sewing

Marly.