Tuesday 27 September 2016

Floating Squares 2


AHIQ


I'm linking this post to the Ad Hoc Improv Quilters.


Two weeks ago I posted about my floating squares, the first exercise in Sherri Lynn Wood's "Improv Handbook for Modern Quilters".


I mentioned there that I would continue this piece, but as yet nothing has materialised, other than pulling some fabric out of the solids box. Other craft projects and w o r k ! have got in the way.

This piece in just under 20 inches square so I could leave it as it is, but I would like to try adding squares in more colours, but retaining the same filler fabric.


Writing about it again makes me want to get cutting and sewing again, but for now I have deadlines to meet!

If you didn't read my post Floating Squares 1 click here to read it now, and then go to The Ad Hoc Improv Quilters to see more amazing improvised quilts.

Happy sewing

Marly.


Sunday 25 September 2016

RSC 16: September is pink with yellow

Each month Angela gives a colour to be used from the scrap bin, and this month the colour is pink with some yellow. We had already used pink earlier in the year, but I managed to find some pink (some the same fabric I used before) and some pink and yellow. I made half an extended bear paw block.


I think I'll still be making these next year!

The last few days I've been working on a present for a friend:


which also has a lot of pink and yellow. As she sometimes reads my blog I'm not publishing photos of  the whole thing until next weekend!

Now I'm also trying to quilt my Star Light, Star Dark quilt before the QAL deadline at Quilty Habit on Monday week. This is a view of the three blocks on the dark side:


and a close up of the quilting so far:

not much done yet!

As I'm quilting each half separately and then joining by QAYG technique I have a feeling I'm not going to make the deadline!

A short post this week, but now you know why! I'm now off to fit the supreme slider and the BSR and hit the FMQ big time!

I'm linking up to:

RSC16        Quilting is more fun than Housework

 so pop over there and see what others have been doing with their scraps this week.

Happy sewing

Marly.

Tuesday 13 September 2016

Improv Floating Squares 1: Score 1


This arrived last Friday:

Sherri Lynn Wood's Improve Handbook for Modern Quilters - my copy and my tools!
after dithering over whether or not to buy it since it's arrival on the market was announced, I finally raided my piggy bank, and I'm so glad I did. This book is crammed full of useful suggestions for organising improv. This was the biggest problem for me I think; I would just start without having considered where I was going, or setting myself limits. I still don't know where it all will lead, but at least I'm not thinking totally open-ended any more.

Following the suggestions in Score 1, I made this 19" x 17" piece.

Score 1: Floating Squares 19" x 17"
The colours are dark red, orange and a cream/yellow; the latter doesn't show up to well in the photo. I set myself the limit of a 20" square, but when I ran out of dark red completely - not a square inch left in my stash - decided to call it a day.

The only tools I used were cutting mat, rotary cutter, scissors, and finger pressing tool (to give my arthritis a break!) All the cutting was freehand, but I did use the lines on the cutting mat as visual guides. I was surprised how quickly I got used to working this way, and while not perfect, a deviation of one eighth of an inch I find acceptable. However it does result in wonky "squares" and when there are two together the deviation is obvious. Next time I have to pay more attention to the orientation of wonky pieces before I stitch them together.

I haven't squared up yet because I'm considering continuing by using the same filler fabric and orange and pink squares as a transition to pink and ... what? I don't know yet; we'll see! At the moment I'm just thinking about what I will do with this if I do stop here.

I enjoyed this exercise enormously and found it so much more satisfying than following a pattern. Who cares about wonkiness? It's liberated wonkiness!

I'm linking to

http://www.conniekresin.com/2016/09/linky-tuesday-september-13th.html   Sew Fresh Quilts  Needle and Thread Thursday  

Pop over there to see what else is going on this week.
 

Happy Sewing

Marly.

Friday 9 September 2016

Secret finish

Last Autumn I won a packet of goodies in the "Quiltmaker" "Back-to-School" project on their blog.
I remember taking photos at the time, but I can't find them, sorry. Anyway it included the then latest edition of  "100 blocks", a tea-mug with a design of patchwork blocks and a quilt kit: this lovely pattern:

That's easy: all the pattern details included! Photo from Hoffman Fabrics.
and the 5" squares to make it:


I have used this kit to make a present for my kind neighbour who lent me her "rollator" (see photo on the right) following my hip replacement surgery three months ago. Unless she has been doing some serious home decorating in the last few weeks these colours will match her living room decor. I shall be taking it to her as soon as I've finished writing this post.

So it took me a year to make this quilt?! Well, no: it took me nearly a year to start making it, but it was pieced in two mornings, and then a month later layered, quilted and binding added in one day. (Delay: no suitable backing fabric; I needed time to get to the LQS!) Yesterday evening I finished sewing down the binding by hand with ladder stitch. I'd never used ladder stitch for bindings before, but having recently learnt it when making my needle turn appliqué circles, I tried it here too. It takes longer than hem stitch, but the result is INVISIBLE! Well almost; I certainly can't get it any smaller.


I found some quilting designs for quilting flying geese on Pinterest (you can check them out on my "Quilting" board.) one of which I used here. I quilted with Aurifil 50 wt, colour 2155 - tan. I also used my recently purchased "Supreme Slider" for the first time, and that made a great difference.

quilting close-up
I used some brownish jelly roll strips, left from another project to make the binding. Fortunately there were four predominantly brown ones left; the piece of binding strip left over was only about 12" long. Usually I cut binding fabric 2" wide, but instead of cutting 0.5" off the 2.5" strips I used them as they were. This was much easier as I could set and the needle in the most right position, three eighths of an inch from the right hand edge of the walking foot and sew the binding on with the walking foot COMPLETELY ON the fabric. Binding on in one take!


One more photo; it is after all a table runner!


I'm linking up to:
http://quiltmatters.blogspot.nl/2016/09/tgiff-we-north-since-1867.html          http://www.conniekresin.com/2016/09/linky-tuesday-september-13th.html 


Sew Fresh QuiltsNeedle and Thread Thursdayblogbutton photo peacockfmq025_zpse5bceb10.jpg
         

Pop over there to see what else has been going on in the quilting world. 

Happy sewing

Marly.


Friday 2 September 2016

Quilty 365: Circles in August

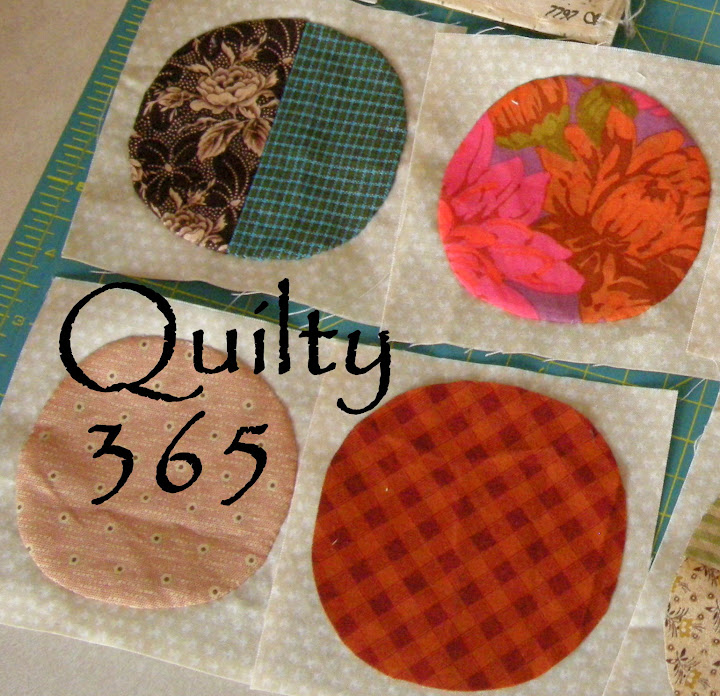
Audrey had the brilliant idea of appliquéing a circle onto a square of cotton every day for a whole year. Never having done needle-turn appliqué I liked the idea and decided almost immediately to join in. All went well until I spent a few days in hospital in the second week in June; I had kept on schedule and my needle turning skills improved enormously. The first five months I could report a full batch, in June half a batch, and in July I also managed to make one a day.

It was one-a-day too during the first half of August:

Oops! There were 16!
There were 16 in August, but one clearly got away!

Then on 16 August I wondered if I had enough for a lap quilt - we don't have quilts on beds around here - so I put all the blocks up on the design wall. I had been picking the fabrics at random so wondered if I could get a balanced layout, or if I should maybe concentrate in future on a particular colour.

My design wall wasn't big enough! I'm afraid I forgot to take a photo, but I got them all in there somehow, with a lot of overlapping.I had clearly enough for a lap quilt, so decided to call it a day! I still have about 20 in a box, that didn't make it into this project.

Anyway the one that got away is in here somewhere:
180 4" (finished) blocks joined in three sections ready for quilting.
I started the layout with red in one corner and blue in the opposite corner (would you believe I have never been to a boxing match in my life?!) Then added green and purple in the other two corners. I wanted  a rainbow effect, but also wanted to have the lighter fabrics in the middle. So yellow went in the middle and then it was a question of filling in the spaces while keeping the colour gradation as much as possible. This took the next 10 days or so! Not helped by all those overlapping blocks falling off the wall!


I made a few more light green blocks to put between yellow and blue (and forgot to take a photo; I was so absorbed in my layout!). For some reason I had enough orange, so on the red side the problem didn't arise.

I joined the blocks into 12 rows of 15 blocks each, and then joined the rows together in groups of four. I shall be quilting them with the walking foot, and then joining them by a QAYG method that I used before here.

I'm pleased with the result so far, and hope I can get it quilted by the end of the year!

I'm linking up to   

Grab button for http://quiltyfolk.blogspot.com/     Quilting is more fun than Housework  http://www.conniekresin.com/2016/09/linky-tuesday-september-5th.html  Sew Fresh Quilts

Hop over there to see more lovely on-going projects.

Happy Sewing

Marly.